

Taking down the holiday decorations is never as exciting as putting them up. One minute, your home is looking wonderfully festive, and the next, you’re trying to remember which box the Christmas ornaments came in while wrestling with a string of lights that managed to tie itself into a dozen knots. With every holiday bringing its own collection of decorations, a good holiday decoration storage system helps you keep a growing collection under control.
Christmas might be the biggest space hog, but Halloween and Easter bring their own storage headaches. That life-sized skeleton isn’t easy to tuck away, and those hand-painted Easter eggs won’t fare well rattling around in a box with ceramic bunnies. It’s worth thinking about what you’re storing before choosing where to put it, so you don’t end up replacing your favorite decorations every year.
How to store Christmas ornaments
Anyone who’s ever opened a box of Christmas ornaments to find a favorite bauble in pieces knows how heartbreaking that little discovery can be. Glass ornaments are easy to chip or crack when they’re packed too tightly, and even sturdier decorations can lose their paint or glitter after months of rubbing against each other. Giving them individual protection is worth the effort.
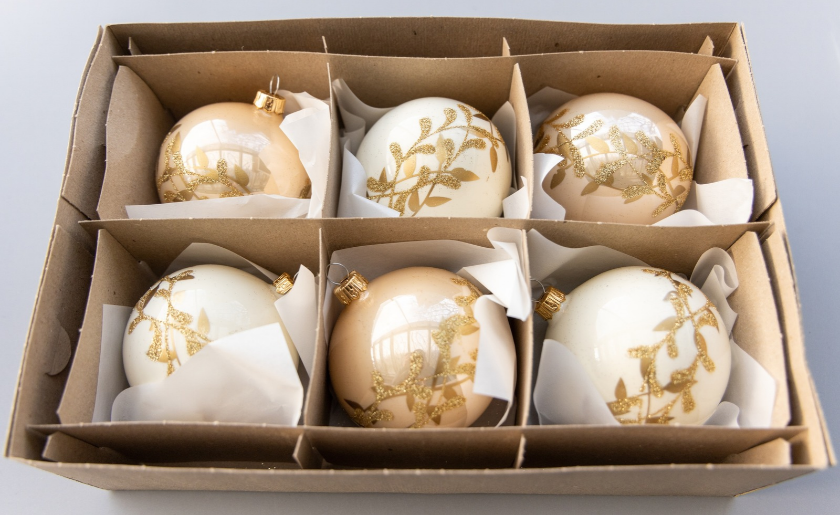
An ornament storage box with built-in dividers is a good investment if you’ve collected more than a handful of decorations over the years. Look for adjustable compartments that accommodate different shapes and sizes, along with sturdy sides that won’t buckle when you stack another container on top. Some of the best ornament storage options also have padded trays or removable layers, making it easier to reach the ornaments at the bottom without disturbing everything else.
Before you start packing, here’s how to keep your ornaments in one piece:
- Sort by material and size and keep delicate glass baubles separate from heavier wooden or ceramic ornaments. Give oversized pieces their own compartments instead of squeezing them between smaller ones.
- Wrap anything fragile individually. Acid-free tissue paper is a good choice for delicate finishes, while bubble wrap can provide extra cushioning for sturdier glass ornaments. Avoid letting glittered or painted surfaces rub directly against plastic.
- Protect sentimental ornaments by wrapping handmade decorations and family keepsakes individually to prevent damage. Small archival boxes can help preserve delicate pieces, while a photo of each ornament helps to keep track of your collection.
- Fill compartments loosely. An ornament should fit comfortably without pressing against the dividers or the lid. If you have to force the box closed, it’s time to make room elsewhere.
- Keep ornament containers away from damp areas. Place heavy Christmas storage bins beside or below ornament containers and keep fragile decorations on shelves out of the way. Fragile decorations should stay on shelves where they’re less likely to get knocked over.
For ornaments that are unusually shaped or too large for standard compartments, a sturdy plastic bin with smaller padded boxes inside can work just as well. The important thing is preventing the decorations from moving around while they’re stored.
Pro tip: If you still have the original packaging for special ornaments, keep it, as the fitted inserts often provide better protection than a standard ornament storage box.
How to store holiday lights without tangling them
The easiest way to store holiday lights without tangling them is to wrap each strand around a piece of sturdy cardboard or a dedicated light storage reel. Keep the wrapping loose enough to avoid putting pressure on the wires, then place everything in a labeled container.
For a quick DIY solution, cut a rectangular piece of cardboard and make a small notch at each end. Secure one end of the light strand in the first notch, then wind the cord around the cardboard until you reach the other end. Tuck it into the second notch to keep everything in place. Empty paper towel tubes work well for shorter strands, too.
If you’re looking to give Martha May Whovier a run for her money with your Christmas light display(opens in new tab), investing in a few storage reels might be a good idea. They’re handy for longer outdoor strands and make it easier to unwind the lights as you decorate. You can also label each reel with the length of the strand and its usual location, so you know which lights belong on the porch and which ones go on the tree.
Make sure to check for frayed wires, damaged sockets or broken bulbs. Replace unsafe strands rather than keeping them for another year and make sure everything is unplugged before handling it. Store your indoor and outdoor lights separately, preferably in sturdy plastic bins that protect them from dust and moisture.
One last trick worth stealing from people who take their Christmas displays seriously is to snap a photo of your lighting setup before taking it down. Next year, the photo shows exactly how you got those lights looking so good.
How to store an artificial Christmas tree
An artificial Christmas tree is best stored in a dedicated tree bag, with its branches folded inward and its sections disassembled according to the manufacturer’s instructions. Start by removing every ornament and checking for any forgotten hooks hiding among the needles. Give the tree a light dusting while you’re at it. You’d be amazed how much dust can settle between those branches over a few weeks.
If yours is a pre-lit model, pay attention to the electrical connections as you separate the sections. Unplug the tree first, then disconnect the wiring carefully rather than tugging at the cords. For flocked trees, handle the branches with care to avoid shedding too much of that snowy coating.
Now, about that original cardboard box. Getting a tree back into one can feel like trying to stuff a sleeping bag into a pouch two sizes too small. A Christmas tree storage bag with reinforced handles and durable fabric will generally hold up better over time. Check the dimensions before buying, since a bag advertised for a seven-foot tree won’t accommodate every model of that height. Wheeled versions are also worth a look if you have a larger tree to move.
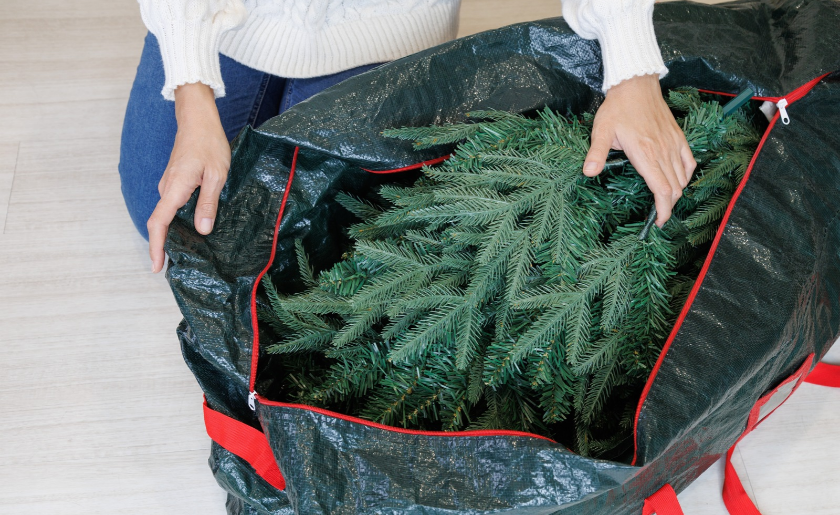
Some artificial trees don’t need to be dismantled at all. An upright storage bag lets you cover the entire tree while it remains assembled, although you’ll need sufficient ceiling height and a stable base. This can be a handy option for anyone who dreads spending another afternoon bending hundreds of branches back into place.
Where you keep the tree matters, too. A dry area away from direct sunlight is preferable, and climate-controlled storage(opens in new tab) may be worth considering for pre-lit or heavily flocked models. Avoid piling other decorations against the bag, as prolonged pressure can distort the branches.
With a little luck, next December’s tree setup will involve less fluffing and a lot more time admiring your handiwork.
How to store holiday wreaths and garlands
Wreaths and garlands are best kept in protective containers that allow them to hold their shape. A wreath storage box is a solid choice for decorated wreaths, while garlands can be loosely coiled into wide plastic bins. Give all that greenery enough room, since flattened branches and bent decorations aren’t the look you were going for.
For wreaths, start by measuring the diameter, including any ribbons or ornaments that extend beyond the frame. Rigid, round containers offer good protection against pressure, although a zippered wreath bag works well when you have a safe place to hang it. If your wreath has delicate berries or glittery accents, tuck some acid-free tissue paper around them to prevent rubbing during storage.
When it comes to garlands, rather than folding them into tight bundles, arrange them in large, loose loops inside a container. You can also wrap them around a wide cardboard tube to prevent kinks, provided the greenery isn’t too stiff. For pre-lit garlands, unplug the lights and check that the wiring isn’t being pinched as you arrange the branches.
Before you pack up the last bauble, follow these steps to store wreaths:
- Hang wreaths using a sturdy hook or hanger attached to a closet rod or wall, making sure there’s enough clearance on either side to avoid squashing the decorations. Slip a wreath storage bag over each one, or use a breathable fabric cover to keep dust from settling between the branches.
- Pack natural wreaths in shallow, rigid boxes, with small pieces of crumpled tissue supporting fragile flowers or pinecones. Make sure they’re dry before packing and avoid sealing dried greenery in airtight plastic containers where moisture could appear.
- Reserve an upper shelf for wreath containers rather than stacking them beneath heavier holiday storage bins. If you need to store several wreaths together, place each in its own protective box and arrange them flat, with the largest at the bottom, without putting pressure on the decorations.
Easter’s floral creations and fall’s leafy displays can join your seasonal collection once they’ve been properly packed, with a clear holiday marking on the outside so you can grab the right one when the occasion calls for it.
How to store Christmas village houses and fragile figurines
Before packing up your Christmas village, photograph the entire display and turn each ceramic house upside down to check for a manufacturer’s label or model number. That information can be useful when identifying pieces later, especially if you’ve collected buildings from different sets. Once the lights are switched off and everything has cooled down, lift each structure by its base rather than the roof, where chimneys and other architectural details are most vulnerable.
Original polystyrene inserts are the perfect candidate for Christmas village storage, since their molded cavities support the buildings in the correct places. Without those inserts, use a small, double-walled cardboard carton for each house. Add bubble wrap around the sturdier parts and build up a soft buffer beneath the base. Nothing should bear directly against a steeple, balcony railing or chimney.
Before closing a carton, try moving it from side to side and if you hear something sliding, add packing paper around the base until the house stays firmly in position. Resist the temptation to squeeze several buildings into a single carton, even when they appear to fit. A little contact between ceramic rooftops is all it takes to chip the paint or break off a corner.
The miniature residents need their own accommodations. A compartmented craft case works nicely for figurines and street furniture, with a piece of soft foam between neighboring objects. For exceptionally tiny accessories, an ice cube tray with a fitted lid can be a good organizer. Write the village name or building number on each compartment’s label so the inhabitants don’t end up relocating to the wrong neighborhood next Christmas.
Battery-powered pieces should have their batteries taken out, while plug-in buildings need their adapters identified before the cables are coiled. A small piece of masking tape marked with the corresponding house number can prevent confusion when several power supplies look identical.
Keep the completed cartons upright, following any orientation markings, and use a shelving unit with a solid, level surface.
How to store holiday linens and fabric decorations
Wash or dry-clean holiday linens according to their care labels, let them dry and fold them with acid-free tissue between the creases to prevent stubborn fold marks and mildew.
That Christmas tablecloth might look spotless after dinner, but gravy splashes and candle wax aren’t always obvious under warm lighting. Check for stains before laundering, since residue left untreated for months can become much harder to remove. For embroidered pieces or anything with beading, skip the vigorous spin cycle and follow the manufacturer’s cleaning instructions. Some decorations are better suited to spot cleaning than a trip through the washing machine.
How you pack fabrics depends on what they’re made of
- Cotton and linen tablecloths: Fold along existing seams where possible, slipping acid-free tissue into the folds to reduce sharp creases. Large pieces can also be rolled around an acid-free cardboard tube.
- Embroidered stockings and handmade textiles: Place them flat in an archival-quality box, with tissue supporting any raised stitching or embellishments. Avoid compressing delicate needlework beneath other items.
- Festive cushions and fabric ornaments: Remove cushion inserts when possible and launder the covers separately. For plush decorations, use a roomy fabric bag or a box with enough depth to accommodate their stuffing without flattening it.
Natural fibers such as wool and silk fare better in breathable cotton bags or archival boxes than in vacuum-sealed plastic. For washable synthetic fabrics, sealed containers can offer protection against dust and pests, provided everything inside is thoroughly dry. Add a clean cotton sachet of cedar if moths are a concern, but keep it from touching the textiles directly, as cedar oils can leave marks.
Choose a cupboard or wardrobe with stable conditions rather than a damp basement. If space is limited, a shallow under-bed container can accommodate folded table runners and seasonal cushion covers without taking over your linen closet.
How to organize Christmas storage bins and decoration boxes
Organizing your Christmas storage bins starts with sorting everything by where it belongs in your home. Group the mantel decorations together, collect the outdoor displays in another container and set aside a box for the smaller pieces you use around the house. Come December, you can tackle one room at a time.

Clear plastic bins let you identify the contents instantly, although opaque ones work just as well with a decent labeling system. Look for sturdy containers with secure-fitting lids, and stick to a few consistent sizes so they stack neatly on shelves.
Before buying a matching set, measure the area where you’ll be keeping them.
Once everything has been sorted, it’s time to decide what goes where:
- Number your containers and create an inventory. Write something like “Christmas 01: Living room” on the outside, then add a list of contents to an index card beneath the lid. For larger collections, a note on your phone works just as well, and you can update it whenever you buy something new.
- Arrange boxes in the order you’ll need them. Place early-season items, such as Advent calendars, toward the front of your shelving. Anything reserved for Christmas Eve can go farther back.
- Add smaller organizers inside larger bins. Compartment trays or repurposed gift boxes can hold stocking holders and other little accessories that disappear among bulkier pieces.
- Distribute heavier objects between several containers rather than filling one oversized box to capacity. Test whether you can lift each one before moving it onto a shelf, and reserve lower levels for the weightiest loads.
- Color-coded labels can help distinguish one holiday from another, too. Orange for Halloween, green for Christmas and yellow for Easter are easy enough to recognize without buying a whole new set of matching Christmas décor boxes.
How to store Halloween decorations and oversized props
Halloween collections can grow faster than you can say Beetlejuice three times, especially when a new skeleton or animatronic creature catches your eye. Before long, you might need an entire closet for your spooky residents. At least you know where all the skeletons are hiding.
Large Halloween decorations(opens in new tab) should be dismantled wherever possible, with removable components packed separately and anything too bulky to take apart positioned so it won’t topple over.
Animatronic props deserve attention first. Consult the manufacturer’s instructions, disconnect the power supply and take out any batteries. Detachable arms and heads can be removed to reduce the amount of room needed, but never force a joint that isn’t designed to come apart. Gather the screws and fasteners in a zippered pouch and attach it to the prop’s frame. For models with exposed motors or wiring, use the original protective packaging where available.
As for those skeletons, detachable limbs can be bundled with soft fabric straps and laid lengthwise in a shallow tote. Keep the skull in a separate padded compartment to protect the jaw and smaller features. Foam tombstones are another story, as their painted surfaces scratch easily, so slide a sheet of cardboard between each one before standing them in a wide carton. If you’ve built an entire graveyard in your front yard, numbering the headstones can help you recreate the arrangement without having to play cemetery architect all over again.
Inflatables need to be completely dry before they’re folded. Wipe away mud or grass stains, let the fabric air out and follow its natural folds without putting pressure on the blower housing. The stakes and tethering ropes can go into a small accessory pouch, while the blower should be protected from impact.
Latex masks and rubber creatures require a softer approach. Instead of flattening them, support hollow shapes with clean, unprinted paper or an appropriate foam form. Keep them away from heaters and prolonged sunlight, both of which can accelerate deterioration. A full-head mask fares better resting on a suitable display head.
For enormous centerpieces, such as a 12-foot skeleton skeleton, measure the longest component after disassembly before deciding where it can live for the rest of the year. A horizontal rack may accommodate long sections, assuming the manufacturer’s guidance allows that position. Check that nothing bears down on the joints or motorized parts and leave yourself a clear route to retrieve the pieces when decorating time returns.
How to store Easter decorations and seasonal crafts
Easter decorations tend to be smaller than their Christmas or Halloween counterparts, but those delicate eggs and handmade creations can be easy to damage.
For Easter decoration storage(opens in new tab), use compartmented trays for fragile eggs, shallow boxes for handmade crafts and separate packaging for anything made from natural materials. The goal is to prevent delicate surfaces from rubbing together while keeping the pieces you spent hours making intact.
An ordinary egg carton can make a handy home for wooden or ceramic Easter eggs, as long as you line the individual slots with acid-free tissue and check that the painted finishes aren’t scraping against the edges. Blown eggshells are another matter altogether, given how easily they crack. For these, choose a rigid ornament case with cushioned compartments that hold each egg securely without applying pressure. Leave the newspaper for reading, since its ink can rub off onto hand-painted designs during months in storage.
Once the Easter chocolate has disappeared, you’re left with baskets that somehow occupy half a cupboard. Try fitting the smaller ones inside larger baskets, slipping a scrap of cotton fabric between wicker surfaces so they don’t catch on each other.
Those with tall handles or elaborate embellishments are better left upright, with nothing wedged inside that might distort their shape. Removable fabric liners can go through the wash, according to their care labels, before being folded and stored separately.
Children’s Easter crafts can be tricky to preserve, given how often they involve glue, glitter and materials that weren’t made to last. Keep paper garlands from getting tangled by winding them loosely around a cardboard roll and slide flat artwork into clear document sleeves so the edges don’t curl. Salt dough ornaments should be checked for cracks and any lingering dampness before going into a small box with enough padding to stop them knocking against one another. Skip the garage for these keepsakes, since changes in humidity can leave you with warped paper or crumbling dough by next spring.
Valentine’s Day cards and Thanksgiving crafts can pile up over the years, too, so why not start a little family archive? Sort the creations into folders by holiday and year, using a slim document case for drawings and paper projects. Anything too bulky to fit can go into a craft drawer with adjustable compartments. You’ll have a lovely record of everyone’s artistic phases, including the years when glitter seemed to be the answer to everything.
For sentimental creations, jot the year and the maker’s name on a tag or on the packaging rather than writing directly on the artwork. Years later, the tag tells you who made that lopsided bunny, proudly presented to the family by a four-year-old artist.
When to use self storage for holiday decorations
At some point, your holiday collection might start competing with the things you need throughout the year. Maybe the garage has become a parking spot for Christmas trees instead of your car, or the guest room(opens in new tab) closet has been taken over by Halloween props. Renting a self storage unit(opens in new tab) for holiday decorations can help you reclaim that room at home while keeping your seasonal favorites together in one location.

The size of the unit depends on how much you’ve accumulated. A 5’x5′ storage unit(opens in new tab), roughly the size of a small walk-in closet, can accommodate several stacks of Christmas storage bins, a disassembled artificial tree and a modest assortment of seasonal displays.
For households with larger collections, a 5’x10′ unit(opens in new tab) provides approximately twice the floor area and can accommodate longer shelving runs or bulkier Halloween props. Keep in mind that usable capacity also depends on ceiling height and how much access space you leave.
Still unsure whether a 5’x5′ or 5’x10′ unit will fit your holiday collection? Try a storage unit size calculator(opens in new tab) before committing to a rental. Enter the items you’re planning to store to get an estimate of how much room you’ll need. It’s worth accounting for shelving and a clear path between your belongings, too, so you can collect your Easter decorations without having to move Christmas out of the way first.
How to arrange your storage unit for maximum space
Set up the unit so you can retrieve one holiday without unpacking the others. Instead of arranging everything wherever it fits, designate a section for each season. Place Christmas items along one wall, reserve another area for Halloween and assign a smaller shelf to Easter.
Adjustable metal shelving keeps containers off the floor and lets you accommodate boxes of different heights. Leave a walkway from the entrance to the back, wide enough to carry your largest item without knocking into anything.
For fragile decorations, the environment deserves some thought. Climate-controlled self storage is worth considering for antique ornaments, handmade textiles and electronics built into animated displays, since extreme temperatures and humidity can affect these materials. Check the facility’s conditions and storage rules before moving anything in. Even with climate control, make sure all belongings are dry and avoid placing sensitive items directly against exterior walls.
A simple floor plan can save a good amount of effort later. Sketch the shelving arrangement on your phone, assign each section a letter and record which boxes occupy each shelf. You could even tape a printed map near the entrance, provided the facility permits it.
Pro tip: Don’t forget to leave a little room for future purchases.
FAQ
What are the best ornament storage containers?
The best ornament storage containers have adjustable dividers, rigid sides and a lid that closes securely. Hard-sided plastic boxes with padded or removable trays protect glass ornaments from moisture and crushing, and the same boxes work for hanging Halloween decorations and small Easter eggs. Choose compartments sized for your largest piece and wrap sentimental items in acid-free tissue first. If you still have the original packaging for special pieces, keep it, since the fitted inserts often protect better than a standard box.
How do you store holiday decorations in a small space?
Use space that sits empty most of the year. Slide shallow lidded bins under the bed, stack matching storage bins on a closet shelf and hang wreaths on the back of a door. Slim under-bed containers(opens in new tab) hold flat items like garlands, table runners and paper crafts. Keep one labeled bin per holiday so you only pull out what you need, and pack each bin with the items you use together.
Can you store holiday decorations in the garage or attic?
An interior closet or spare room is the better choice. Garages and attics swing between hot, cold and humid, which can warp paper and wicker, soften wax, damage lights and speed up deterioration in latex masks and fabric. If the garage is your only option, use sealed plastic bins and keep them off the floor and away from exterior walls. Store delicate or electronic pieces indoors.
Are plastic bins or cardboard boxes better for holiday decoration storage?
Plastic bins with secure lids work best for most decorations, since they block moisture, dust and pests and stack evenly. Cardboard works well as an inside layer. Use dividers for ornaments, tubes for wrapping lights and padding between ceramic or foam pieces. Natural fabrics like wool and silk do better in breathable cotton bags or archival boxes than in sealed plastic.
How do you decide which holiday decorations to keep, donate or throw away?
Keep decorations you still love, use every year or attach to a memory, and donate those in good condition that you haven’t displayed in a couple of seasons. Throw away lights with frayed wires or damaged sockets, anything moldy or musty and pieces too broken to repair. Do this sorting as you take things down, before anything goes into a bin, so you only store what’s worth the space.
Until the next holiday comes around
From the tiniest Christmas ornament to the tallest Halloween skeleton, every decoration has its own storage needs. Once you’ve figured out the right packaging and found a suitable home for your collection you can enjoy peace of mind knowing your decorations stay protected between holidays. There’s something charming about opening a box years later and finding the handmade decorations, family favorites and little reminders of celebrations past just as you left them. The holidays return before you know it, so make the next round of decorating more enjoyable.
Now all that’s left is to enjoy your home without the festive clutter. Until, of course, it’s time to deck the halls all over again.



Holiday Decoration Storage: A Guide for Every Season
Taking down the holiday decorations is never as exciting as putting them up. One minute, your home is looking wonderfully festive, and the next, you’re trying to remember which box the Christmas ornaments came in while wrestling with a string of lights that managed to tie itself into a dozen knots. With every holiday bringing its own collection of decorations, a good holiday decoration storage system helps you keep a growing collection under control.

Where to Get Moving Boxes in Philadelphia
Philadelphia’s historic charm can put your patience to the test on moving day. Between cobblestone streets, narrow rowhouse entrances and the occasional pothole, you don’t want to worry about not having enough boxes on top of it all. Start gathering your moving boxes early and you’ll have one less box to check off on packing day. Luckily, you have plenty of places to get your boxes from.

Art Supply Storage from A to Easel
Paint tubes, brushes, sketchbooks, scraps of paper, beads, half-used rolls of tape and that one very specific pen you swear you just had in your hand. Building up an art supply collection is rarely a neat process, and each new material brings its own storage needs.

Scary Good DIY Halloween Decorations That Won’t Haunt Your Wallet
A few floating candles in the hallway, a family of ghosts by the front door and a suspicious number of bats climbing up the bedroom wall can make October feel a whole lot spookier. While Halloween stores are full of tempting finds, some of the best DIY Halloween decorations can come from things you already have tucked away in drawers, closets or the recycling bin.

Suburban Giants and Urban Risers: Where America’s 100 Largest Metros Fall on the Self Storage Map
Self storage has long been a suburban story. Across America largest 100 metros, 59% of the inventory built over the past decade sits outside city cores, largely preserving the ratio of the total existing inventory.

Sweatshirt Storage Ideas Worth Keeping Up Your Sleeve
Sweatshirts are great until you realize how much room they take up. A few thick hoodies can fill a drawer fast, with lighter crewnecks getting squashed underneath or pushed somewhere you forget about. Good sweatshirt storage can make that pile much easier to manage without requiring a bigger closet.

Living Room Storage Ideas: 28 Ways to Reclaim Your Hosting Space
If a living room is where most of a household’s living happens, good storage should be the top priority for setting up or revamping the place. After all, think of how easier it would be to have people over when tidying up the place is just a matter of putting things in their right place (in a time when fewer and fewer people are entertaining friends at home(opens in new tab)). The trick is making room for all those wayward clothes, blankets, chargers and other small things that end up on (or, inexplicably, in) the sofa. Here are 28 living room storage ideas to get you started and make tidying up a quick affair.

25 Mudroom Storage Ideas (And Mistakes to Avoid)
When you come home with muddy boots, an armful of bags and a coat you can’t wait to take off, it’s nice to have somewhere to put it all. With a mudroom, you can leave the outdoor mess at the door instead of carrying it through the house. Traditionally, you’d set aside a separate room, but you can just as easily use a hallway, an entryway closet, a laundry-room corner or a stretch of wall near the entrance.

Is Your Home Office Worth the Rent? What Coworking and Self Storage Could Save You
Every square foot of your apartment comes with a price tag, and a home office claims more of them than most renters expect. It starts with a desk. Then come the second monitor, the printer, the filing cabinet and the overflow boxes. Before long, the corner you set aside for work has turned into a small room you are paying for every month.